When a test result crosses a threshold, Traverse takes action based on rules defined in action profiles. Some possible actions include sending email, sending SNMP traps, opening trouble tickets, or running an external script.
Navigate to Administration > Actions > Create an Action Profile.
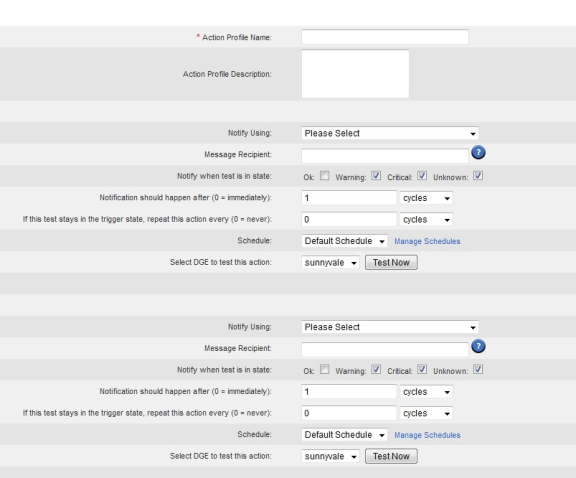
Create an action profile with two levels of escalation. In this example, email is sent immediately to the admin when a test goes into warning, critical, or unknown state, and to the manager after a test is critical for 15 minutes during peak hours.
Click Create Action Profile to create the profile.
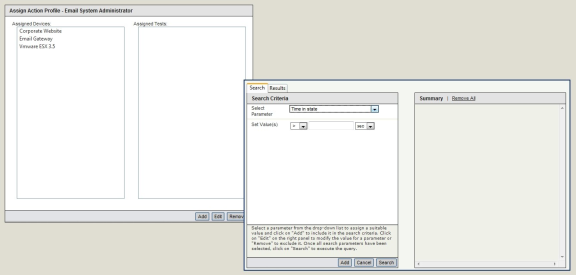
To assign this profile to tests, click Assign to Tests in the row where the new action profile now appears on the Manage Action Profiles page, and then click Add.
Choose a parameter you want to search with, then a value, and then click Add to use this as a search criterion. Add as many other search criteria as you like, and then click Search.
In the Results pane, select the devices whose tests you want to use the action profile, and then click Assign Action Profile.
The Assign Action Profile page now lists all of the devices with tests to which this action profile is assigned, and if you click on a device, you can see the specific tests on that device that are using the profile.
By default, tests and actions run all the time, but you can control when they run by creating and assigning schedules to them. For instance, you might want some tests and actions to run only during business hours.
Navigate to Administration > Other > Custom Schedules > Create a Schedule.
Enter "business hours" in the Schedule Name field, uncheck all the boxes for days and times that fall outside of business hours, and then click Create Schedule.
To assign this schedule to a device, click Select Devices For Schedule in the row where the new schedule appears, and then click Add.
Choose a parameter you want to search with, then a value, and then click Add to use this as a search criterion. Add as many other search criteria as you like, and then click Search.
In the Results pane, select the device you want to add, and then click Assign Schedule. The new schedule is assigned to all tests for that device.
You can also assign a schedule to specific tests through device administration.
Navigate to Administration > Devices and click Tests in the row for the device whose tests you want to schedule.
Click the Modify icon in the row for the test you want to schedule, and then use the drop-down Schedule menu to assign a schedule.
You can assign the new business hours schedule to the actions in your action profiles as well.
Navigate to Administration > Actions and click Update in the row for the action profile you created.
For each action, use the drop-down Schedule menu to assign a schedule.