The Traverse security model controls user access to the data generated by customer networks and to Traverse user functions that act on that data.
Note: A full description of the security model is described in Users and Departments in the Traverse User Guide.
To help quickstart your deployment of Traverse, the most common security scenario for MSPs is described below. This configuration will ensure that all your MSPs have access acrossall departments. Keep in mind the following guidelines:
Create a unique department for each customer organization. You may need to create more than one department for larger organizations.
Ensure all the departments you create use the same, single user class.
Define the customers of MSPs as users of a selected department. Users of departments only have access to the data in their own department. A department user with the same name as the department is created automatically for you, each time you create a department.
Define all MSPs as users of the same, single admin group. Each admin group can only be assigned to one admin class. Ensure the admin class you select is mapped to the single user class you are using for all your departments.
Some of the steps below require superuser access. Your configuration steps make use of the following pages, in case you have to return to them.
Superuser > User Class
Superuser > Admin Class
Administration > Departments
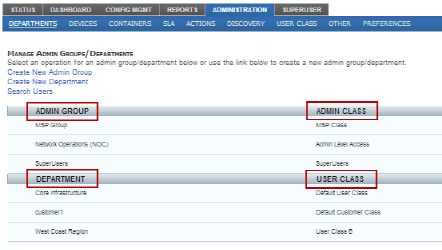
When you're done, review the Administration > Departments page. It's a good way to summarize your security configuration, as shown in the example below:
Configure an Admin Group and Admins
Log in to your Traverse website as superuser.
Navigate to Superuser > User Class and click on Update for the Default User Class.
Change the name to be Default Customer Class and click Update User Class. Alternatively, you can create a new user class instead of renaming the existing one.
Navigate to Superuser > Admin Class and create a new admin class called MSP Class.
Now click User Class Mappings and then Assign User Class to Admin Class. Select the default grid that is presented and click the Update Privileges button.
Navigate to Administration > Departments and click Create new Admin Group. Create a new admin group called MSP Group belonging to the MSP Class.
Create new users in the MSP Group for each of your staff by going to Administration > Departments and clicking on Create User.
At this point, you have the basic security model setup with all your staff belonging to MSP Group.
Configure a Department and User
Log into your Traverse website as superuser.
Navigate to Administration > Departments and then click Create New Department.
Give a meaningful name to the department. A default user will be automatically be created with the same name as the Department name. You can provide this user logon to the MSP's customer if the customer requests access.
Ensure the new department uses the Default Customer Class described in step 2 of the previous procedure.
You can optionally create a Read Only user for this same department. Click Create User and add a new user. Using the user’s email address as the login is recommended. Make sure you set the user's role to Read Only when you do.
Creating URL with auto-login: You can create a URL with an encrypted username and password to do autologin for a single Traverse page by using the Auto-Login URL generator at www.zyrion.com/support/tools/urlgen/