The migration of data from Network Monitor standalone to Network Monitor integrated with the VSA is a mapping process between two datasets.
The goal of the mapping process is to find and map each asset in the standalone configuration with a corresponding asset the VSA configuration. Doing so preserves the monitoring configurations defined for each asset and their thresholds, reports, actions, schedules and historical data.
To successfully perform this mapping process there needs to be one network for each gateway in the original standalone configuration and one device for each asset, where the device and asset MAC address are the same.
Note: See "What do I do when I find an unmapped asset?" in the FAQ section below.
Preparing the KNM configuration
Make sure you are on the latest version of KNM v5 (Build 9977).
Make sure your license covers the number of devices you currently have in standalone.
Remove all unnecessary gateways and devices.
Uninstall all gateways on their remote network Windows machines.
Use Windows Add/Remove Programs on each Windows machine hosting a gateway to uninstall the gateway. If not present, use nmservice.exe -u in a command box to uninstall the gateway. Then delete the KNM installation directory to remove any leftover files.
For the local gateway, navigate to the local gateway directory and type nmservicelg.exe -u.
After the migration you will use agents to install and uninstall gateways.
Archive all log files in the <Kaseya_Installation_Directory>\knm\logs directory, then delete these log files.
Remove all operators (KNM users) from the standalone that do not have access to the VSA.
Discontinued feature and changed features
Auto login is discontinued.
Network Monitor no longer uses the SSL certificate specified by the WEBSERVER_CERT parameter in the init.cfg file. Network Monitor still supports using an SSL certificate but is configured as part of the VSA installation. For details, see Using SSL Certificates.
All configuration data will be migrated to the SQL Server using by the VSA.
Before installing VSA R91
Make the necessary changes and clean up the configuration.
Copy the entire KNM folder structure to a safe place.
Using the Control Panel, run the uninstaller for Kaseya Network Monitor.
Copy the KNM folder created in step 2 to %KASEYA_HOME%\knm, where KASEYA_HOME is the intended folder where KInstall will install VSA.
Display the Windows Services console. Click Action > Refresh to verify that all the KNM services really are gone, before running KInstall.
After installing VSA R91
The nmservice.exe process should be running. The ksubscribers database should have a new namespace called KNM.
Check the SQL server conversion in the resulting log file <Kaseya_Installation_Directory>\knm\fbmigrator_log.txt.
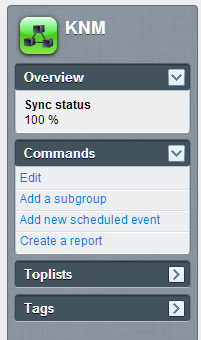
When starting the integrated Network Monitor module for the first time inside the VSA, the module runs in sync mode. In sync mode existing VSA assets are mapped to migrated KNM device data. The interface will only show the mapped assets and their related entities, such as orgs, networks and machine groups. Sync status progress can be viewed in the property pane on the right side of the browser.
KNM is automatically restarted when 100% sync is reach, if 100% sync cannot be achieved, the user can manually terminate sync mode by running the vsa-set-sync-complete console command described below and restart the service.
FAQ
What happens to my users?
They are synced with users in the VSA if they have the same name. Please make any necessary adjustments in the VSA or KNM before performing the conversion.
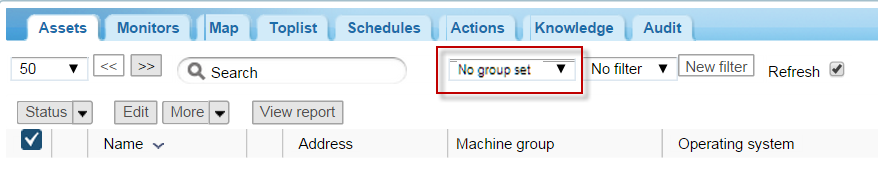
I can't get 100% sync, can I find out which assets still not synced?
Yes, in sync mode there is an extra option in the org/group selector that shows assets yet synced called "No group set"
What do I do when I find an unmapped asset?
Devices that can't be mapped will appear in the Unmapped group in the KNM tree. While networks are being scanned assets will be checked against devices in this group, if they match up they will be removed from the unmapped group and placed in the relevant network. You will likely end up with a lot of devices that cannot be mapped. There are a number of different ways to deal with devices in the unmapped group.
They can get automatically mapped when scanning a network. If the asset belongs to a network not yet discovered, install an agent probe and scan the network using the Discovery module..
You can use the manual sync function. You should select one device and then use the manual sync command. This is done from the unmapped group only. The user is then prompted for an asset already received from the VSA that the device will be merged with. This way old data such as statistical data is preserved.
You can use the Add asset function. You should select a number of devices from the unmapped group and choose this command. This command works in bulk. You will then have to select a machine group that the assets will be created in. Once you click OK the assets will be created and they should be visible in the Discovery module.
They can be permanently removed from the configuration by selecting devices and choosing the Delete command.
Do I need to attain 100% sync?
No, you choose what to migrate and what to leave out, if you are happy with what you see in the configuration, you can terminate the sync at any point using the system admin command line.
Is the sync percentage shown anywhere in the interface?
Yes, in the property pane of the KNM node.
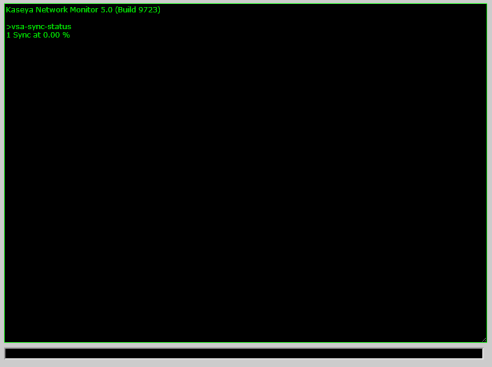
What console commands are available for this operation?
vsa-sync-status - Shows the status in percent per tenant.
vsa-set-sync-complete - Restarts KNM after a successful sync.