Each dashboard component has a menu icon and a maximize/minimize icon in its title bar. When the component is minimized, the icons appear as follows:
The menu icon provides the following options:
Search: Allows you to modify the dashboard component data source by searching and selecting new tests.
Edit: Allows you to edit the dashboard component properties.
Delete
Note: There is a limit of 20 components per dashboard.
Creating a Dashboard Component
Navigate to the Dashboard tab.
Select the dashboard where you want to place the new dashboard component.
Click the Add Dashboard Component icon in the upper right of the dashboard.
In the Create Dashboard Component form, configure the dashboard component properties:
Component Type: Select the icon for the type of component you want to create.
Title
Refresh: Use the slider to choose a refresh interval. Each component has its own independent refresh interval. It is best to keep the refresh interval at around 2-5 minutes (avoid intervals less than 1 minute).
Click Apply to continue to the Component Data Source form, where you select the data source for the component.
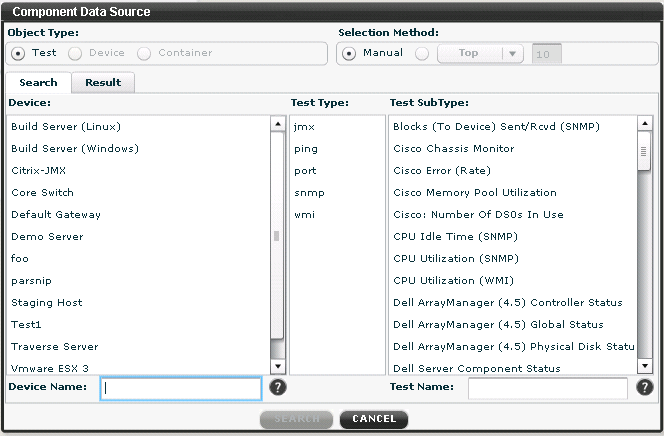
Choose the Object Type (Test, Device, or Container). Depending on the component type you've selected, the available object types may be limited.
Choose the Selection Method. Depending on the component type you select, the available selection methods may be limited.
Manual: Lets you search to find the tests you want to appear in the component; the component will contain a drop-down menu to let you choose which test you want to view.
Top/Bottom: Select Top or Bottom from the drop-down menu and enter the number of items you want to appear in the component; the component will show the items with either the greatest or least test results.
To look for tests to include in the component, choose search criteria from the Device, Test Type, and Test SubType lists (use the Ctrl key to select multiple items within a list), and then click Search. Alternatively, you can enter a wildcard Device Name and Test Name to search all matching devices and tests.
Drag the tests you want to include in the component from the Matching Tests list to the Selected Tests list.
Click Apply to create the dashboard component.
Modifying the Properties of a Dashboard Component
Navigate to the Dashboard tab.
Select the dashboard that contains the dashboard component you want to modify.
Click the menu icon in the title bar of the component and select Edit.
In the Update Dashboard Component form, you can make changes to the Component Type, Title, and Refresh properties.
Click Apply to continue to the Component Data Source form, or Cancel to exit without making any changes..
In the Component Data Source form, you can optionally make changes to the data source.
Click Apply to complete your property updates, or Cancel to exit without making any changes.
Modifying the Data Source for a Dashboard Component
Navigate to the Dashboard tab.
Select the dashboard that contains the dashboard component you want to modify.
Click the menu icon in the title bar of the component and select Search to open the Component Data Source form.
In the Component Data Source form, you can make changes to the Object Type, Selection Method, and selected tests.
Click Apply to complete your updates, or Cancel to exit without making any changes.