![]()
![]()
![]()
|
|
|
|
This lab walks you through installing the BYOD gateway.
Step 1. Select Server for BYOD gateway
See Tech Specs for recommendations/requirements for your BYOD gateway server.
BYOD gateway can run in a virtual machine. Once running you should not copy or clone the virtual machine because the gateways may conflict with each other. See Can I copy or clone a virtual machine with a BYOD gateway for more details about running in a virtual machine.
Step 2. Validate Server
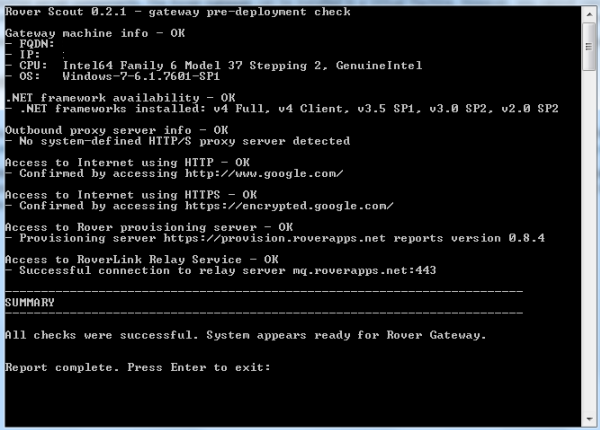
The Scout utility is used to validate if your server can support the BYOD gateway. See Verify Relay Service for more information. Scout checks for required server components like .NET Framework as well as connectivity to the relay and provisioning services. Scout runs in a Windows cmd.execmdscout-h
Specifying a Proxy Server and Port
If your server connects to the Internet via a proxy server make sure Scout reports the proxy server name used. If your proxy server is not a system defined resource then you may have to give Scout the proxy server information.
Use the following to force Scout to use a specific proxy server if it does not find it by default.
scout.exe -p http://proxyserver:proxyport
proxyserver and proxyport are the hostname and port of your proxy server, respectively. The -p option tells Scout to use that proxy, not the system-defined one.
Note any instructions in the Summary that you may need to install and configure the BYOD gateway.
If Scout does not confirm your server is ready for BYOD gateway, resolve any issues before going to the next step. If you need to contact support to resolve any problems reported by Scout, make sure to include the log info returned from Scout in your support request.
NTLM Authenticated Sites
Scout can also be used to test the Internet Tunnel feature to NTLM authenticated sites using the following command line options:
scout-x.x.x.exe -q -x -d -w http://sitename/ -u DOMAIN\username:password
If scout returns a 200 status code, OK, then you should be able to configure the BYOD gateway to tunnel to the tested site.
Step 3. Install and Register BYOD gateway
The install does not create YOUR BYOD gateway during the installation step. This step simply installs the BYOD gateway program files on the server.
After the install you will be prompted to start the BYOD gateway Service. Starting the service for the first time will start the registration/provisioning process for YOUR BYOD gateway. Once you provision YOUR BYOD gateway a data directory is created with YOUR BYOD gateway specific information. This data directory contains information specific to YOUR BYOD gateway and should not be copied or shared with any other BYOD gateway. Multiple instances of the BYOD gateway data directory should not run at the same time. This could be an issue for people trying to copy or clone a VM with a BYOD gateway and end up running multiple copies of a BYOD gateway. You can uninstall a version of BYOD gateway and install an updated version without harming YOUR BYOD gateway configuration. The contents of YOUR BYOD gateway data directory are not deleted when you uninstall BYOD gateway. For more information on how to find YOUR BYOD gateway data directory see Why can't I find my gateway data directory. If you want to delete any existing BYOD gateway and provision a new BYOD gateway on a server you will need to delete the data directory. Anytime the BYOD gateway service starts and does not find the data directory it will begin the registration/provisioning process.
See BYOD gateway - Installation for step by step instructions to install/register BYOD gateway.
You now have BYOD gateway installed and provisioned and are ready to configure your BYOD gateway.
See the next lab to get started.