Click any single row to display the Device Details dialog for an existing single device. These are the same properties as adding a new device.
Enter values in these required fields:
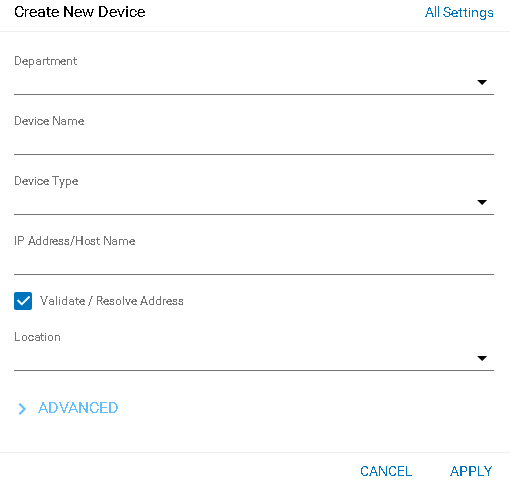
Organization - Only displays when logged in as an administrator.
Device Name - Enter a name for the device.
Device Type - Select the type of device you are configuring from the drop down list (for example Linux or any other UNIX server, Windows server, managed switch/hub, IP router, firewall appliance, load balancer, proxy server, VPN concentrator, wireless access point or any other).
IP Address/Host Name - Type in the fully qualified host name or IP address of the device.
Validate / Resolve Address - If checked, validates the address immediately when you click Apply.
Location - Select a location. Locations are created by a superuser using the Superuser > DGE Mgmt page. (Each DGE Location is a collection of DGEs, not necessarily in the same physical location, that are grouped for load-balancing purposes.) If this device will be monitored via WMI, select a DGE Location that contains WMI-enabled DGEs.
You can now click Apply or...
Click Advanced to enter values in these optional fields.
Device/OS Vendor
Device/OS Model/Version
Tag 1 through Tag 5 - Specify custom attributes. You can use these attributes to create rules for populating device containers. For example, if can use Tag 1 to store values for the City the device is located in, Tag 2 to store the value of the State. Once users have entered city and state information for each device, you can create a device container that automatically includes all devices where City equals San Jose and State equals CA.
Comment - Add a comment as necessary.
Display Comment in Summary - If checked, displays the comment on the Status > Devices > Device Summary page..
Automatically Clear Comment When In OK State - If checked, clears comments from device information when a device is "OK". This option is useful during maintenance periods. If you are disabling a device maintenance, you can insert a text message (such as down for maintenance) in the comment field and click on the Display comment on the Summary Screen to display the message. If you select the Automatically Clear Comment When... option, this text message is automatically cleared when the device is enabled and has 0% packet loss. This prevents situations where a device fails after maintenance, but (because of the maintenance message) the administrator sees the device as down due to maintenance.
Flap Prevention Wait Cycles - Select the number of cycles to show a state of TRANSIENT when a devices has switched to a new state. For example, assume the flap-prevention cycle is configured to be 2, and a ping test is configured for a 3 minute interval. When the ping test switches from a state of OK to a state of WARNING, the Traverse user interface will display the ping test in a TRANSIENT state for 2 additional cycles (2 times 3 min = 6 min) before displaying the ping test in a WARNING state.
Enable Smart Notification - Leave selected to prevent getting alarms on tests when the device is unreachable. See Smart Notifications for more information.
Enable Test Parameter Rediscovery - If checked, several other options display on this page. Traverse uses these options to periodically rediscover SNMP and WMI tests. See Test Parameter Rediscovery for more information.
Click Apply..
All Settings
Click the All Settings link to create a device manually using the legacy Create Device page. The Create Device page has these additional properties.
Click All Settings create a device using the legacy Create Device page. This page includes
Create New Tests After Creating This Device - If checked, when you save this page, an additional Add Standard Tests page displays enabling you to create tests for this device.
Create Device Dependency After Creating This Device - If checked, when you save this page, an additional window displays enabling you to assign the device a parent device. See Device Dependency.
Enable Network Configuration Management - If checked, Traverse backs up configurations for a network device. See Network Configuration Manager for more information. If this option is selected, an additional Schedule Configuration Backup Frequency option displays. Enter a frequency and choose Hour(s) or Day(s) from the drop-down menu to enable automated backups.
Enable Process Collection - If checked, you can use the process monitor to return metrics for device processes. Requires the device be either WMI or SNMP enabled.Read Only - Displays only for admin group users. Enables an administrator to create a read-only device in a department.