Setup Change Requests Service Desk
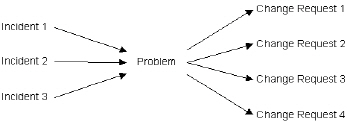
The Change Request desk is based on ITIL guidelines. Change requests have their own life-cycle, not necessarily related to customer support issues. Change requests are approved or rejected. If approved, then the change request is tracked through to successful completion. Change requests can be associated with multiple incidents reported by customers. When the change request is implemented, customers with related incidents can be notified.
A change request ticket describes a change to a product or service. They don't involve organization/contacts or problems directly. Instead they describe, in technical detail, exactly what aspect of the product or service has to be changed. Change requests can be created internally, or can be associated with a problem ticket. Frequently a single problem ticket can be the source of multiple change requests.

Configuration
- Create the Desk - Click the Install Desk button for the
Change Request Desksample service desk using Service Desk > Desk Templates. - Assign Users to User Roles - Assign users requiring access to the Service Desk module to user roles—such as
SD UserorSD Admin—that use theService Desk AdministratorsorService Desk Techniciansrole type. - Associate the Desk with User Roles - This service desk is not automatically associated with any user role. If you assign users to a user role that uses the
Service Desk Techniciansrole type, you must associate this desk with that user role using Role Preferences or the Desk Definition > Access > Roles tab.This step is not necessary for users assigned to user roles—such as
SD Admin—that use theService Desk Administratorsrole type. - Assign the Desk to Scopes - Assign this desk to the scopes of users who use roles—such as
SD User—that use theService Desk Techniciansrole type.This step is not necessary for users assigned to user roles—such as
SD Admin—that use theService Desk Administratorsrole type. - Verify Outbound Email is Enabled - Ensure that outbound emails are enabled using System > Outbound Email.
Topic 5984: Send Feedback. Download a PDF of this online book from the first topic in the table of contents. Print this topic.