The Configure SLA Manager page displays a list of all the department's configured SLA measurements. Each row contains the SLA measurement name and description. Additionally, there are links for updating each SLA measurement's properties, assigning tests, or deleting the measurement.
Creating a New SLA Measurement
Navigate to Administration > SLA.
On the Configure SLA Manager page, click Create an SLA Measurement.
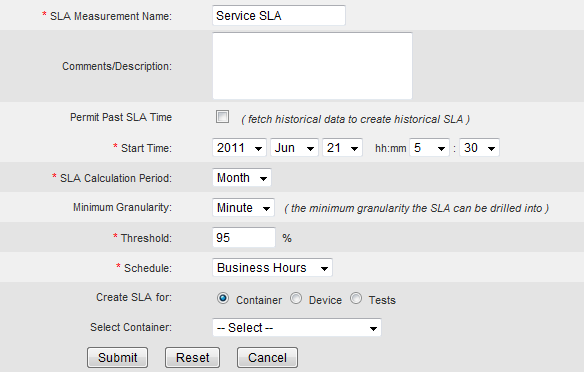
Fill out the fields in the Create an SLA Measurement form:
SLA Measurement Name
Comments/Description: An optional field that lets you provide some additional descriptive information that will appear in the SLA Manager list of SLA measurements.
Calculation Period
Calculation Frequency
Threshold: The percentage of the Calculation Period that the metric must be in the OK state.
Schedule: Used to specify business hours and weekdays for calculation of the SLA period.
Select whether the SLA is being created for a Container, Device or Test.
If you selected Container or Device, then via the drop-down list, select the specific container or device for which the SLA is being created, and then click Submit.
If you selected Test, then click Submit to go to the page for selecting the underlying device tests for this SLA metric, and then click Add.
Choose a parameter you want to search with, then a value, and then click Add to use this as a search criterion. Add as many other search criteria as you need, and then click Apply to run the search.
In the Search Results pane, select the tests that you want to be a part of the SLA metric for each device, and then click Assign to SLA Measurement.
You can now click on the devices you've added in the Assigned Devices list, and the tests you selected will appear under Assigned Tests. Use the Add, Edit, and Remove buttons to make any further changes to the devices and tests you want to include.
Click Done to finish creating the SLA measurement.
Modifying the Properties of an Existing SLA Measurement
Navigate to Administration > SLA.
Click Update on the line for the SLA measurement you want to modify.
In the Update an SLA Measurement form, you can make changes to the SLA Measurement Name, Comments/Description, Calculation Period, Calculation Frequency, Threshold, and Schedule fields.
Click Submit to complete your updates, or Cancel to exit without making any changes.
Changing the Tests Assigned to an SLA Measurement
Navigate to Administration > SLA in the Traverse web application.
Click Assign Tests on the line for the SLA measurement you want to modify.
Click on a device in the Assigned Devices list to see the tests assigned for it, and then use the Add, Edit, and Remove buttons to make changes:
Use the Add button to perform a search for new devices to add.
Use the Edit button to open a window where you can check or uncheck tests for the selected device.
Use the Remove button to remove a selected device, or click on a single test and use the Remove button to remove that test only
Click Done to return to the Configure SLA Manager page.
Note: When an SLA member is deleted, the SLA becomes defunct and no further data will be collected. The data collected prior to the deletion will still be available. In the SLA configuration screen, you will see DELETED in the column where the members have been deleted.